Showing posts with label Crazy Quilting. Show all posts

Sunday, August 16, 2009

Pictures

Well I don't know about you but I can't see the pics in my previous post. Rather than take time from cleaning this morning to try and fit the pictures with the words I thought I'd just post the pics here and you can read the post below. Back to work!


Posted by Picasa

Saturday, August 15, 2009

More blocks

I made a few test blocks last weekend (ok so actually I made 8!) as I try to decide which will be my next quilt project.


I liked all of them and may end up with several new projects instead of just one. But that is a good thing - I can use up some of my stash!


I also tested out a few color combinations I don't usually use ... I love gray and plan to do something with this block ... just not sure what!


... and then there is orange! I love the look of this combination and plan to make more so this also is in the running for a larger quilt project. It was fun digging into the stash and I came across lots of fabrics I forgot I had.

Posted by Picasa

Monday, February 09, 2009

Crazy Shortcut Quilts

I recently blogged about a new book I had purchased titled "Crazy Shortcut Quilts" by Marguerita McManus and Sarah Raffuse. I was contacted by the Author and she offered to send me a sample of her technique.

I was happy to receive this great little sample because I could see how it was constructed and it makes it look so easy.

I can't wait to give it a try on my next project. A big thanks to Marguerita McManus for sharing this with me.

Posted by Picasa

Sunday, January 18, 2009

Hearts 2 Round Robin

Over the years I've swapped hearts with many ladies on the internet and I've always wanted to do something with them. I recently joined a Round Robin on the CQI list entitled Hearts. I knew I wanted to use one of the hearts I had swapped I just needed to figure out how.

After several trial and error attempts I came up with this block. I'm really excited to send it out for the ladies to work on in the RR. I used a lot of swap fabrics also to make this truly a group block. Pat Winter pieced the heart and now five ladies will stitch around it. I plan to ask them to add as many pansies and dragonflies as they want!

Don't you think this is going to be a cool block?


When the block comes home I plan to use this gold to make the borders of the block.

Posted by Picasa

Saturday, January 17, 2009

Attach a button making a flower.

Here's a great way to attach buttons to your project. You will need a four (4) hole button, thread - I use green to resemble the stem and leaves of a flower and a bead.

Align the button in the direction you want the flower. Stitch the stem and leaves coming out of the same bottom hole - add the bead to the top hole and you have a simple but fun flower!

Posted by Picasa

Sunday, December 14, 2008

Tips for attaching the Cameo

I had a question about how I attached the cameo to my fabric and I thought I'd answer it here.

I use a really easy technique ... I glue the cameo to a piece of felt. I cut the felt so it is just a tiny bit larger than the cameo. Then I do my first row of beading through the felt. After the first row of beads are added I attach the cameo to the block and continue to bead.

If I were adding a lot more beads I might do this off the block and attach the cameo after I finish the beading but in this instance I wanted it to be securely attached to the block so I beaded the last row directly to the fabric.

Easy!

Sunday, November 23, 2008

Fixing another block


I showed you this block earlier ... the starkness of the cream pieces just didn't feel right to me. I snipped a few seams and lifted out the offending pieces and replaced them with colors I liked better.

I actually moved the green fabric closer to the center because I thought it worked better there. I added a little gold piece under it and repeated a piece I used in two other spots. They say uneven numbers work better and in this case I think "they" may be right. I then added a piece of the focus fabric (the center piece) up in the top left corner and now I really like the block even more than before.


As you can see lighting makes all the difference in taking a picture. The top block was taken in a well lit room with no flash. The new version was taken at home with less than great lighting but you get the idea. It definitely flows better now.

I hope you see that if you don't like the way a block turns out it doesn't take much effort to change it. Playing around with a block before you put all the effort into embellishing can really pay off. Learn to trust your instincts about what you like and don't like.

The motif I stared here has the markings for three 'stumpwork' flowers. LOL ... well if we wait until I get proficient at stumpwork, enough to make three flowers, this block would never be finished!!

I'm playing around with a few ideas to use instead of the flowers. Here I auditioned some of the wooden buttons I got in my last batch of buttons.

These are some tiny little buttons that I found in the bottom of the button jar. Next I think I will play around and try some silk ribbon flowers or maybe some beads .... to see what I like.

That's what I love about Crazy Quilting ... no rules ... go with the flow ... try out ideas until you find one that works! As they say on the popular show "Project Runway" - It's your block ... make it work! (well maybe they don't say it quite like that but I bet Tim would say it if he were talking to a crazy quilter!)

Saturday, November 22, 2008

Fixing a problem

Here is another example of fixing up a block after it has been pieced. After taking pictures and looking at them on my computer I found the cream pieces were too 'stark' and stood out more than I liked. It is really an easy task to clip the stitches holding the fabrics together (did I mention that I hand piece my blocks - this makes it even easier to change my mind!)

As you can see from the after picture (below) just changing out the two pieces made all the difference in the world. It also helps that the second picture was taken in a well lit area without using the cameras flash. The colors shows up much better under the right lighting.


My theory on piecing is to live with a block for a few days and really look at it critically. If something does not look right it is easy to change and can make such a difference in the finished piece. Now it's back to making the changes to the other block that I wasn't satisfied with.
Posted by Picasa

Friday, November 21, 2008

My latest Block

Using a light box I transferred this patten to the latest block I'm working on. It turned out great and I plan to use this method many more times in the future.

I started stitching on it toward the end of class on the last day. One thing I have decided is I don't like the cream pieces of fabric in this block so before I go any further I will be taking them out and replacing it with other fabrics.

I also loved taking pictures in the classroom of blocks because the lighting was great ... I didn't need to use a flash and I was able to get true colors. You can really judge your blocks better when you can see a good picture of them.

Posted by Picasa

Wednesday, November 19, 2008

The Back of the Quilt

One last shot of the back of the quilt.


Posted by Picasa

Tuesday, November 18, 2008

Crazy Quilt Center Squares

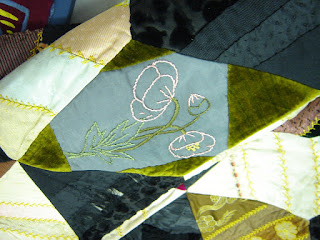
Here are a few close up shots of quilt number two. Some really cool painted motifs can be found on this quilt.

There are hardly any embroidery motifs on this quilt. Seam treatments are the dominate embellishment, but I did spot these butterflies. They really blend in and are about the only motifs on the quilt.

Another hand painted flower motif.

This is one of the few prints found on the quilt. There is a crease across the middle of the piece and I wish they would take it down and try to fix it. If it were mine I'd fix this baby right up! I really like the white seam treatment on the top of this print.

Posted by Picasa

Monday, November 17, 2008

1800's Crazy Quilt

As promised here are four of the blocks from the one quilt that has old blocks but I don't think it was put together by the original maker. Each block has an old ribbon in the center.


Posted by Picasa

Sunday, November 16, 2008

Another Crazy Quilt

Hope you are not too bored yet with my tour of the EGA Gallery. One of the highlights of the class was a trip into the back room of the gallery. While in the room I spotted the back of a crazy quilt on a table. I quickly moved over to it to see if it really was a crazy quilt. Surprise! It was!

I asked our guide if we could see it a little better. He said yes but he couldn't open it all the way since the table was not clear and he didn't want to damage the quilt any further. They have not finished preparing it for safe storage yet.

The quilt was made in a tumbling block pattern and the little peek I got of it was not enough. I keep asking if I could see just a little more...please! :-) Unfortunately we never could get him to entirely open it up but we did get to see a little more each time we asked.

I really wish we could have seen the entire quilt. What we saw of it was beautiful. And as you can see it was never finished so we were able to see the back! Such a treat!

The motifs were beautiful! Some of the silk was deteriorating and I could have spent the entire afternoon just looking at this one quilt. Because of the damage to it I doubt it will ever be displayed in the gallery but maybe if you ever get to visit you might ask and they might just show it to you.

Posted by Picasa

Crazy Quilts on DIsplay

There were two Crazy Quilts on display at the EGA Headquarters. Both were situated on walls that made it impossible to get a good head on shot.

I took this one from the side. My thoughts on this quilt are that someone found these blocks and sewed them onto a large piece of velvet to display them. Each block has trim surrounding it that definitely dates to modern day. The blocks are old but the finished piece is not nearly as old.

This quilt was on another wall in a different area. I couldn't get a good shot of it but I understand Rissa was able to climb into the closet and got a better angle. She is going to send me pics when she gets home! Hopefully it will be a better picture than this one. I have a few good close ups and will be posting more pictures throughout the week.

Posted by Picasa

Friday, November 14, 2008

Crazy Quilt - EGA Gallery

There are a few crazy quilt pieces displayed at the EGA Headquarters. Here is one by J. Marsha Michler. I'll try to get pictures tomorrow of the other pieces.


Posted by Picasa